Rug Pads For Hardwood Flooring

How do you remove residue from hardwood floors?

Cleaning can be an essential part of self-care for some people. The feeling of getting something done and the smell of a clean space could send anyone to bliss town. After a long day of cleaning, though, there’s nothing worse than seeing a layer of residue on your supposedly pristine hardwood floors. Your floor may be clean, but you need to take extra steps if you have to remove cleaner residue from wood floors.

Floor Cleaner Residue

Take a mental inventory on every time you’ve cleaned your wood floors. If they’re always sticky or have a layer of residue, technically, you’re not doing anything wrong. It’s the product that you’re using to clean your wood floors. Floor cleaners do make floors clean, but you have to look at what they’re formulated with before you use them. A lot of cleaners contain three main ingredients: water, solvents and surfactant.

The solvents will cut through dirt while the surfactants make it easier to wipe up the dirt. Unfortunately, it’s the surfactants that cause the residue on wood floors. That’s why it’s important not to mix cleaners. Also, you should stick to one cleaner per wash. If you’re noticing that your floor is always sticky, then you may need to dilute your cleaner because of the number of surfactants in the bottle.

Removing Floor Cleaner Residue

If you’re the type of person that likes to make do-it-yourself solutions to clean their house, you may be upset to learn that vinegar is not the best ingredient to use when cleaning wood floors. It can leave marks, as well as eat away at certain types of wood. So, although you could use vinegar to clean your wood floors, you should try to limit the amount you’re using, and how often.

When you’re cleaning hardwood floors, many people think that they’re cleaning the actual wood. You’re actually cleaning the protective layer on the hardwood floor. Vinegar is slightly acidic, so over time, it can break down the finish of your floor. This will leave your floor looking dull over time.

Windex on Wood

If your floors are always getting sticky, try using an ammonia-free glass cleaner on wood like Windex. Ammonia cleans up sticky stains and scuff marks. A lot of people stay away from ammonia because it has a strong chemical smell, so if you hate that smell, try diluting it.

Always make sure that you rinse the Windex on wood, or it will damage your floor over time. When cleaning with Windex on hardwood floors, all you have to do is spray sections and let it sit for two minutes. After it sits, wipe up the dirt. Then, go over the floor one more time with a clean damp cloth to remove the Windex.

Other Residue Removal Hacks

Before you clean your hardwood floors, always sweep or dust mop to get rid of dirt or debris. Don’t soak your floors with a lot of liquid; instead, spray a light mist. You can use a mop, but they leave a lot of water on hardwood floors, so use a microfiber mop instead.

Cloudy Wood Floors

In order to not get cloudy wood floors, prevention is always key. You should always keep maintenance up with the wood floor, as well as stay away from oil soap, wax or wood cleaners that will damage your floor. Also, if you like to use ammonia on your floor, don’t use it often. If you use ammonia every day, it can strip off the finish, as well as warp the wood floors.


Why are My Hardwood Floors Hazy?

The most common causes of a hazy or cloudy film on hardwood floors after cleaning are a buildup of floor cleaner, wax buildup, trapped moisture, and bad floor cleaners. All these can make wood floors appear to have a milky, white substance on top of the surface even after cleaning.

Identifying and understanding causes of white haze will help in taking an appropriate removal and restoration method to get it off the wood floor.

I have explained how these distort the shine of your wood floor and how to restore the look below.

Hardwood floors are supposed to have a beauty and luster that bring out the best in your living space. When floors get dull or cloudy, they can be difficult to fix. It’s possible, but without proper knowledge, your efforts to restore the look of your hardwood floors can make matters worse.

Identifying the root causes of cloudy or milky-looking hardwood floors can help get you to a proper solution without hours and hours of trial and error:

  • Use of improper cleaners: With a market full of all kinds of wood cleaning products, picking the wrong cleaner gets easier and easier. The types of cleaners that were effective years ago might not have a good effect on modern wood floors. Products like oil soaps, paste wax and furniture polish should be avoided since they are notorious for leaving a hazy, sticky buildup on your floor.
  • Frequently change or rinse cleaning pad: Rinse out microfiber cleaning pad thoroughly or change the pad completely between rooms to avoid dragging a dirty pad throughout the house instead of removing the grime off the floor.
  • Clean kitchen floors last: Usually kitchen floors have the most dirt and grime buildup, so clean them last to avoid carrying that dirt to other floors in the home.
  • Wax buildup: Floors that have a polyurethane finish do not need to be waxed. If waxing a floor that doesn’t need it, the wax will react negatively with the finish and create a cloudy look.
  • Cleaner buildup: When cleaning hardwood floors, less is more. A small application of cleaner on a microfiber mop is all that’s needed to clean your floors. Hazy floors can occur when too much cleaner is used.
  • issues: Water and hardwood floors don’t mix. While water can be used as part of the cleaning process, too much water on a hardwood floor can damage floors and alter its look. Avoid using a string or sponge mop to clean since they don’t do a good job of absorbing water once they’re fully soaked.
  • Improper application of finish: If the finish is applied over a layer of stain, or previous coats of finish aren’t fully dried, the solvent vapors trapped beneath the finish can create this look.


How to Remove a Cloudy Haze on Hardwood Floors

Using the appropriate cleaner for your hardwood floors will prevent the buildup of cloudy or milky substances after cleaning. However, if you ready have the white stuff forming, you might want to explore some ways to fix the problem.

Here’s how to remove a cloudy buildup from your hardwood floors:

  • Remove the carpet or the furniture or any item on the cloudy area
  • Fill a bucket with luke-warm water
  • Dip a microfiber cloth in the luke-warm water and wring to leave it just damp.
  • Gently rub and wipe the area with the cloudy film with the damp cloth until it is gone.
  • Pat the area dry with a clean cloth or Re-washable Microfiber Mop Pads.
  • Allow some time to air dry before you return your area rug and furniture in place


Use of Mayonnaise

Use olive oil in mayonnaise to leach out water in cases where the cloudy haze is a result of blushing out.

Here is the procedure for using olive oil in mayonnaise.

  • Take the mayonnaise and spread it on the cloudy deposits.
  • Leave it overnight to seep in and replace the water in the cloudy area.
  • Wipe off the mayonnaise in the morning with a dry cloth.

Use of Steam Cleaner

Steam cleaning remains one of the best of removing stain and stubborn dirt and grime on the hardwood floors when uses appropriately. Steam cleaning is capable of getting rid of white haze out of the hardwood floor. It has an added advantage of sanitizing the floor by killing 99% of household germs an even get rid of bug menace on your floor.

Always pick the best steam mop for hardwood floors to avoid floor damage as well as get effective results. Another main benefit is steam uses water but not harsh chemicals thus leaves your floor safe for pets and kids.

However, only use a steam cleaner machine on sealed floors. Take precautions to avoid over steaming one area, failure to which it will damage and leave white spots on your hardwood floor.


Tips & Tricks to Polish Hardwood Floors

When it comes to polishing hardwood floors, it’s best to approach the job with a gentle hand. There’s no need to aggressively work the polish into your floors. Let the polish do all the work when applying.

  • Get your floor ready. Remove furniture, dry mop and clean with Bona PowerPlus Hardwood Floor Cleaner.
  • Measure your room and know your square footage. One 32oz bottle of Polish covers 500 sq. ft. You will use one full bottle of Polish for every 500 sq ft.
  • Do not shake the bottle of polish—gently rock it back and forth for 30 seconds to 1 minute to assure a consistent sheen level.
  • Spread a nice even layer of polish across the floor so it can self-level.
  • Let the applicator pad do the work—just guide the puddle of polish back and forth with the wood grain… only fingertip pressure on your mop.
  • Work in small sections on the floor, making sure you don’t trap yourself in a corner!
  • Only Polish floors every 2-4 months, or longer depending on the traffic in your home.

Efficient Interior Painting

What should I look for in painting?

What Is Paint?

Paint is a mixture of four basic ingredients: pigments, resins, solvents, and additives. Pigment is the color, and resin is the binder, or glue. Solvent is the carrier that makes it all liquid and evaporates as the paint dries. Additives provide specific performance characteristics, such as stain-blocking or mold-killing properties.

Cheap paints have a higher percentage of solvents per volume than better pains. As a result, there can be up to 50 percent less pigment and resin in a gallon of cheap paint. This means that most of what you are applying with cheap paint is solvent (water or mineral spirits), which just evaporates, leaving little pigment behind. This is why you have to recoat and recoat up to four times with low-quality paint before enough pigment is left behind to cover the color underneath.

So learn from the pros, who value their time: buy the best paint you can afford and avoid having to paint more than twice. Look for manufacturers with a good reputation, and check the label looking for products containing about 45 percent pigment and resins per volume.


Water-Based vs. Oil-Based Types of Paint

All paints basically fall into two solvent categories that define their type: water-based or oil-based. Water-based paint actually has water as a solvent, but just to confuse everyone this paint is most commonly called “latex” even though it does not contain latex. Many water-based paints are made with acrylic and may be called “acrylic latex.” The label “oil-based paint” is equally confusing, because it isn’t actually made with oil; it has a solvent of mineral spirits (also known as paint thinner) or alkyd resin. Alkyd can be thinned with mineral spirits, and latex paint is thinned with water. At the paint store, you’ll be understood if you use the terms latex paint or alkyd or oil-based paint.


Expert Advice on How to Look at Paintings

No knowledge needed

Being able to understand paintings is not a skill you either have or you don’t – it’s something anyone can learn. You don’t need detailed knowledge of art history to enjoy an artwork or develop your own taste. You just have to know how to look at art. With a few tips you can get started and become an art enthusiast yourself.

When we look at something, whether this is a work of art or something different, our human brains read it and generate meaning. Different clues make up our understanding of images, often even unconsciously. So when learning to look at art, you basically only have to slow down this process that is already happening in your mind. It only takes three simple yet very effective steps to become conscious about this process.

Step 1: Take a look

This step may sound very obvious, but it actually isn’t. People often don’t take enough time to look at artworks. In museums, visitors spent only an average of 15 seconds in front of a painting. So let’s start with taking some time to notice what you are looking at. Try to pay attention to the size, colours and material of the artwork. What kind of shapes and lines are shown? What is the composition of the painting like? What textures are visible? All these different visual elements were decided deliberately by the artist, and will therefore determine the overall feel and meaning of the work.

Step 2: See what is there

Seeing is not the same thing as looking. Whereas looking is about describing what is in front of you, seeing requires applying meaning to a picture. This is called iconography in art history terms. We see symbols in paintings which we can interpret.

Step 3: Think

The last step is to think about what you have observed. This step is about connecting the first two steps and thinking about possible interpretations. Giving meaning is something relative; it’s not about facts.

The broader context of a painting will help make reading the artwork easier. This context can be found through labels and descriptions. They can help you to place the work in a certain time period and relate it to an artist or movement. Maybe you even already have some knowledge about the subject. With all this information you will be able to put the pieces together in your mind and come up with your own interpretation.


Common Characteristics of Good Paintings

Good painters don’t merely recreate what is in front of them. An experienced artist knows how to create a successful painting, no matter what situation or model he or she is presented with or the materials being worked with.

Of course, this often comes after years of practice and experimentation — as well as the development of a unique artistic voice. But there are some basic characteristics that all good paintings have in common. As you are thinking about just how to paint your next composition, keep the following three tips in mind.

  1. A Strong Focal Point

A focal point is not like the big, bold “X” that marks the spot on a treasure map. It can take on any shape and size. It can be bold but it can also be subtle. A dappling of light, a pop of color, an expression or emphatic gesture — any of these can become a focal point in a composition.

Regardless of how it is created, its purpose should be to engage the viewer or act as the culmination of the momentum built in the work.

  1. Layers of Color

When it comes to painting characteristics, color is key to keep in mind. Color makes a painting tranquil or vibrant, dramatic or stark. And, this comes about not only in your color choices but also how you build passages of color over one another or side by side.

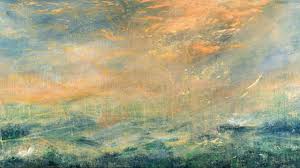
Warm and cool colors in a sky create a sense of atmosphere and space more than any one swath of color — no matter how perfectly matched it is to the sky above.

  1. Changes in Direction

In many great paintings, the image is realistically rendered, but brushstrokes are clearly visible. You are aware of how the painting is painted. Think about how the paint application of Jan van Eyck versus Vincent van Gogh perfectly reflects or resonates with what the artists painted.

The way a brush moves paint around makes a statement that should be taken advantage of. You can start by being mindful of your brush’s changes in the direction, literally working on a painting with different strokes and from various angles.


Things You Should Give Up to Be a Successful Artist

Give up on the “not enough” mind frame

Successful artists don’t frame things around “not enough.” There is never enough time, not enough money, not enough confidence, not enough of whatever it is at that moment to make or do what you need to do to be a successful artist.

Give up comparisons

Here’s the thing about comparisons: you are always going to be better at some things than other people, and worse at other things. Dwelling on either isn’t going to get you anywhere. It can stifle your creativity as an emerging artist to compare yourself to someone who is twenty years into their career, and it can stunt your growth to compare your work to someone who is just starting out. Instead of focusing on how you stack up next to someone else, invest that energy into comparing your recent work with the work you made six months ago, a year ago and five years ago. Have you grown? And where do you want to see yourself six months, a year, and five years in the future? Only compare yourself to yourself.

Give up on making excuses

If you want to be a successful artist, you have to show up. You have to do the work. If you are like any other artist in the world, you probably have said to yourself at one time something along the lines of, “I can’t go to the studio today because I’m too busy/ too heartbroken/ my family needs me too much/ [insert any excuse here.]” And you know what? It feels good to do that. It feels justified and reasonable and like you are doing the right thing for yourself.